Talking head videos are an excellent way to share information, connect with an audience, and communicate ideas directly. It’s a popular form for educational content, product reviews, tutorials, personal vlogs, and more. In this guide, I will lead you through the steps on how to make a talking head video. We’ll go through the entire process, from planning to filming and editing your video.
What Is a Talking Head Video
A talking head video is a type of video where the speaker addresses the camera directly, usually from the chest or shoulders up. The speaker is often the main focus of the video, and the background is either minimal or blurred. This form is called “talking head” because the video mainly consists of the person’s head as they speak to the audience.
Talking head videos are typically straightforward. The person in the video is usually explaining something, sharing personal thoughts, or providing an opinion. Maybe you often see this type of video on YouTube, in online courses, or during interviews.
The main feature of the talking head video is that it’s very personal. It helps viewers feel like they are having a direct conversation with the speaker, which builds a connection and increases engagement.

The Benefits of Talking Head Videos
Talking head videos offer numerous benefits that make them a popular choice for creators. Here are some of the most important advantages:
Builds Trust and Connection
Talking directly to the camera helps you form a personal bond with your audience. Viewers feel like they are having a conversation with you, making your message more resonant and engaging.
Effective for Explaining Complex Ideas
When you need to explain a topic in detail, a talking head video is an excellent choice. You can break down complex information, share stories, and give lessons to ensure your audience understands the message better.
Great for Educational and Promotional Content
Talking head videos work well for tutorials, how-to videos, and product reviews. Whether you’re explaining how something works or discussing a specific topic, this form lets your audience understand your content better.
Simple to Produce
Compared to other types of video content, talking head videos are relatively easy to produce. You don’t need to worry about fancy camera setups, animations, or large crews. All you need is a good camera/phone, a microphone, and some basic lighting.
Great Talking Head Video Examples
To better understand the effect of the talking head video, let’s take a look at some great talking head video examples:
TED Talks
TED speakers often use talking head videos to share inspiring ideas with audiences worldwide. These videos are a perfect example of how a talking head video conveys a clear and concise message.
YouTube Tutorials
Many YouTubers create tutorials in the talking head style. Channels like Khan Academy often use this video form to explain educational topics clearly and engagingly.
Product Reviews
If you’ve ever watched a product review on YouTube, it is very likely to be a talking head video. Influencers and tech experts use this form to give detailed opinions on gadgets, software, or services. The personal touch makes viewers feel more confident in the recommendations.
Vlogs
Many vloggers frequently use the talking head form to share personal stories, experiences, or opinions. The direct-to-camera style gives the viewer a sense of intimacy and makes them feel like they’re a part of the conversation.

How to Plan a Talking Head Video
Planning is important for a successful talking head video. Without proper planning, your video may lack focus. Here’s how to plan your video:
1. Define Your Purpose
The first step in planning your video is to clearly define its purpose. Ask yourself: What do I want my audience to take away from this video? Whether you’re teaching, promoting, or sharing personal experiences, your purpose will guide the direction of your video.
2. Write a Script or Create an Outline
Once you have a clear purpose, the next step is to organize your content. Some people prefer writing a detailed script, while others love using an outline. Both methods work, but the key is to avoid rambling and stay on topic.
3. Know Your Audience
Think about who will watch your video. Are they beginners or experts on the topic? What tone will resonate with them? Knowing your audience will help you choose the right language, tone, and speech style.
4. Choose Your Key Message
What is the core message you want to communicate in your video? This should be the main focus of your content. Avoid overwhelming your viewers with too much information. Stick to one or two key points that you can explain thoroughly.

How to Film a Talking Head Video
Filming a talking head video might seem easy, but a few details can make a big difference in the final result. Here are some tips for filming:
1. Set Up Your Camera
Your camera should be at eye level. Looking directly into the lens will make the video feel more personal. Place the camera on a tripod or steady surface to avoid shaky footage. If you’re using a smartphone, make sure it’s oriented in landscape mode for the best aspect ratio. If you’re using a camera, ensure the focus is sharp and clear.
2. Keep Good Lighting
Good lighting is essential for a professional-looking video. Natural light from a window can work well, but if you’re filming indoors, you might need to invest in a lighting tool. Ensure your face is well-lit and there are no harsh shadows.
3. Use a Great Audio-Recording Equipment
Audio quality is as important as video quality. You don’t want your viewers to struggle to hear you. If possible, use an external microphone, as the built-in microphones on cameras or smartphones often record unclear sound.
4. Find a Clean Background
Make sure the talking head video background is clean and uncluttered. A simple, neutral background works best. You can also use a blurred background effect to focus attention on yourself.
5. Positioning and Framing
When filming, make sure you are centered in the frame. Leave a small amount of space above your head and keep the camera at eye level. You need to look directly into the lens to maintain eye contact with the viewer.
6. Start Filming
Now that everything is set up, start recording. Speak clearly and maintain eye contact with the camera. Stay natural, and don’t worry too much about making mistakes – you can always edit out any errors later. Make sure you stay engaged and energetic, as this will help hold the viewer’s attention.

How to Make a Talking Head Video in Post-Editing
Once you’ve shot your talking head video, it’s time to edit it. Editing allows you to remove errors, add effects, and improve the pacing of your video. How to edit a talking head video? First, you need to choose a good video editing application. This step will determine whether your subsequent entire editing process goes smoothly. Here, I recommend you to use MiniTool MovieMaker, a free video editor without watermark. Whether you are a beginner or experienced, you can easily use it to create the desired video.
Now, let’s see how to make a talking head video using MiniTool MovieMaker.
Step 1: Download and Install MiniTool MovieMaker
Click the button below to download free video editor, and follow the instructions to install it on your computer. After installation, open the program, and you’ll be ready to start editing your talking head video.
MiniTool MovieMakerClick to Download100%Clean & Safe
Step 2: Import Your Media Files
Once the software is open, it’s time to import your media files. These include your video footage and any audio files you need to use. Click on the Import Media Files button. A window will pop up where you can browse and select the video and audio files you want to use. After selecting your files, click Open to add them to your project. Your media files will appear in the media library on the left side of the screen. Then, drag your video and audio files from the media library to the timeline at the bottom of the screen.

Step 3: Delete Unwanted Parts
If you make a mistake in the middle of a clip, you can cut the wrong part with the split function. Here’s how to remove the middle part of the clip.
- Click on the target clip in the timeline to select it.
- Move the playhead to the point where you want to start splitting and click on the Split icon.
- Move the playhead to the end of the unwanted section, and click the Split icon again.
- Right-click on the unwanted part of the video and choose Delete to remove it.

Step 4: Crop Video
Cropping your video is a great way to adjust the framing of your video. If the video shows too much of the background or you want to focus more on your face, cropping can help you. To crop your video:
- Click on your video clip in the timeline to select it.
- Click the Crop icon on the timeline toolbar. A window will appear where you can adjust the cropping frame.
- Drag the white handle of the frame inwards to focus more on you. You can also move the entire red frame to center the subject if necessary.
- After adjusting, click OK to crop the video.

Step 5: Adjust Audio
If you want to change the volume of the audio file, click on the audio on the timeline. Then, go to the Music Property window, drag the Volume slider to the left to decrease the volume, or drag the Volume slider to the right to increase the volume.

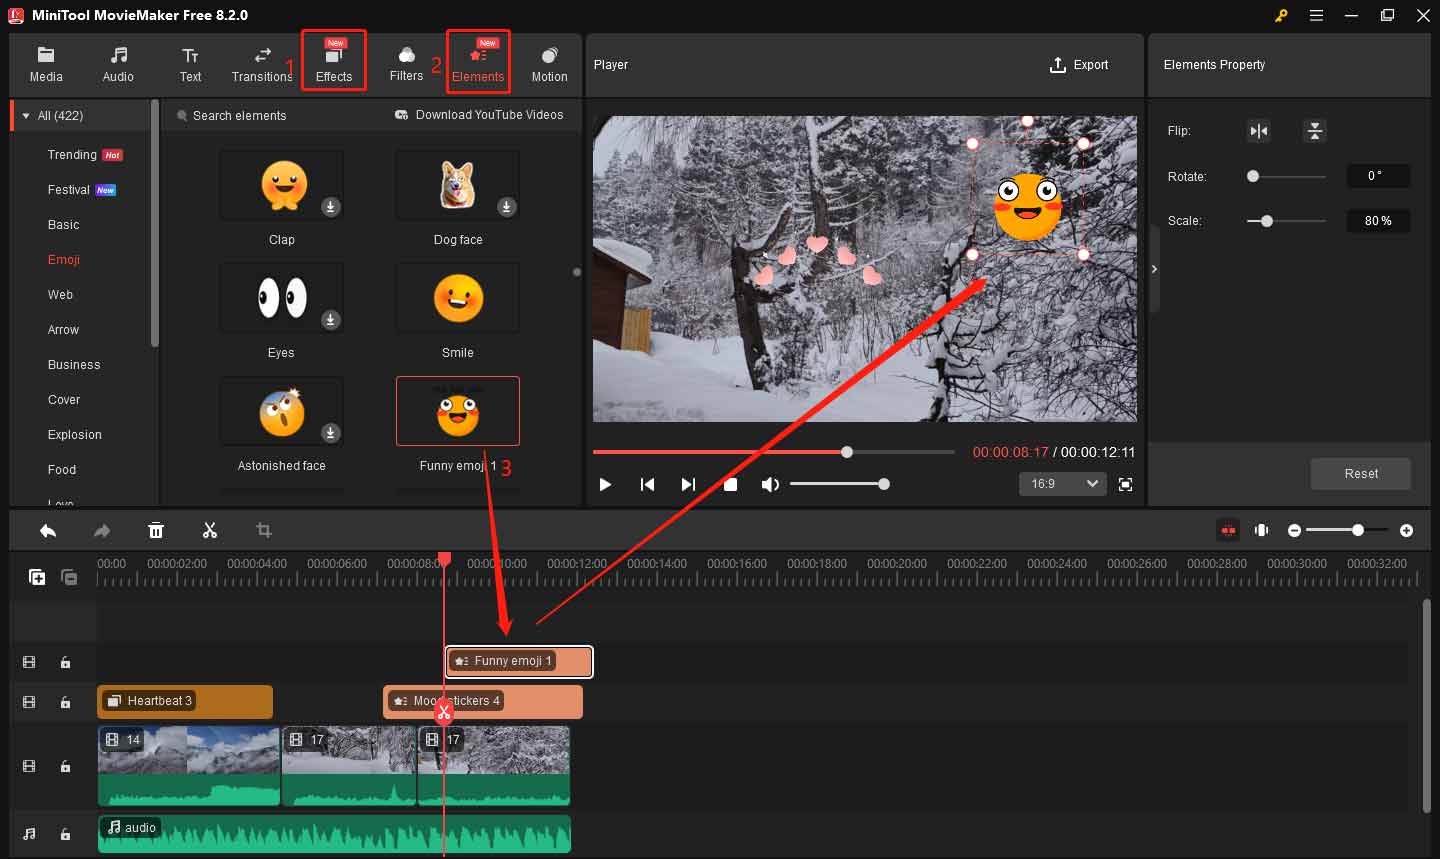
Step 6: Add Effects and Elements
Perhaps you may think your video will be a little boring. So how to make a talking head video interesting? In the post-production editing, you can add some interesting special effects and stickers to enrich your video. To add effects, click on the Effects tab, choose your favorite effect, and drag it above the target clip. To add stickers, go to the Elements tab, find the desired sticker, and drag it above the target clip.
Step 7: Export Your Video
Once you’re satisfied with the edits, click on the Export button in the top-right corner. In the Export window, give your video a name, set the file location, and choose the format, resolution, and frame rate. Finally, click Export at the bottom to start rendering the video.

Of course, MiniTool MovieMaker has many other features besides the ones mentioned in the above steps. I will list some of them below.
- It allows you to easily trim video clips to remove unnecessary parts at the beginning or end of videos and keep the middle parts you need.
- You can add background music to your videos using the built-in library or import music from your local files.
- You can fade music, gradually increasing or decreasing the volume, which is perfect for creating smooth audio transitions at the start or end of the video.
- It enables you to add customized titles, captions, and credits to your video.
- It supports a wide range of file formats for video, audio, and images, ensuring compatibility with most media files.
- With MiniTool MovieMaker, you can work with up to 9 video tracks and 2 audio tracks, so you can create richer video effects.
- It provides a convenient copy-and-paste function, enabling you to duplicate clips, music, and other elements quickly, making the editing process more efficient.
MiniTool MovieMakerClick to Download100%Clean & Safe
Conclusion
In conclusion, learning how to make a talking head video is an excellent way to connect with your audience and share your message effectively. By following the steps outlined, you’ll create an engaging video. Remember, practice makes perfect, so don’t be discouraged if your first video doesn’t turn out exactly as planned. With time and effort, you’ll become more proficient.
Whether you’re creating content for social media, business, or personal use, mastering the art of making a talking head video will help you communicate more clearly and authentically. Finally, if you have some problems editing your videos with MiniTool MovieMaker, please feel free to contact us via [email protected] for help.
About The Author

Position: Columnist
Yulia has a great passion for life. She enjoys photography and travel, and is always eager to record cherished moment through her lens. This also led to her strong interest in video editing, and she kept learning multimedia-related knowledge, hoping to bring readers better advice on images, audio, video, and related topics.